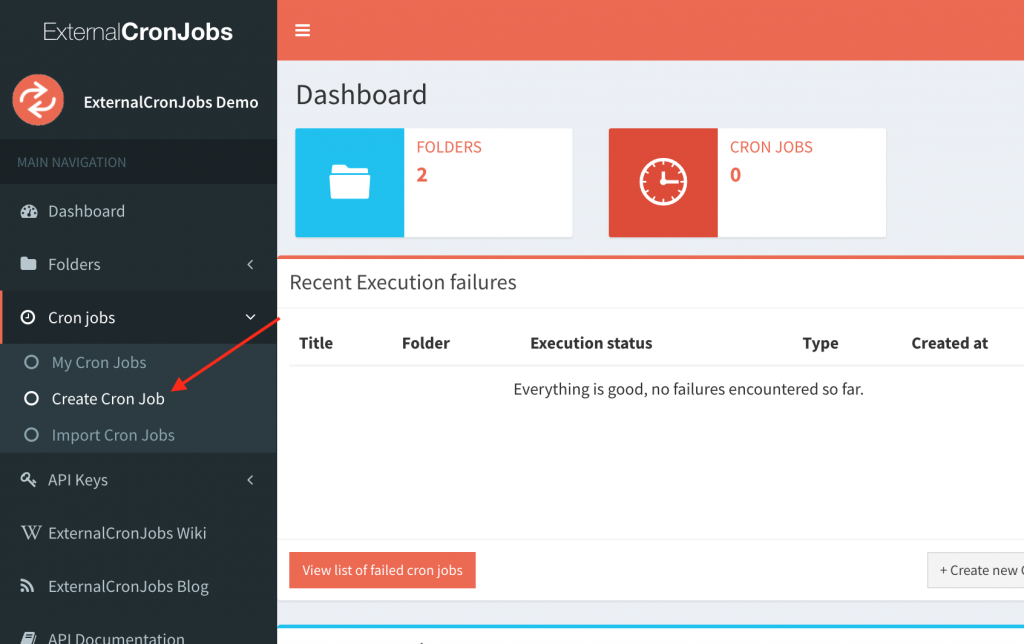
To create a cron job, you need to first go to “Create Cron Job” section in left panel. See below screenshot
Clicking on Create Cron Job will open a new page where it will ask for all required fields.
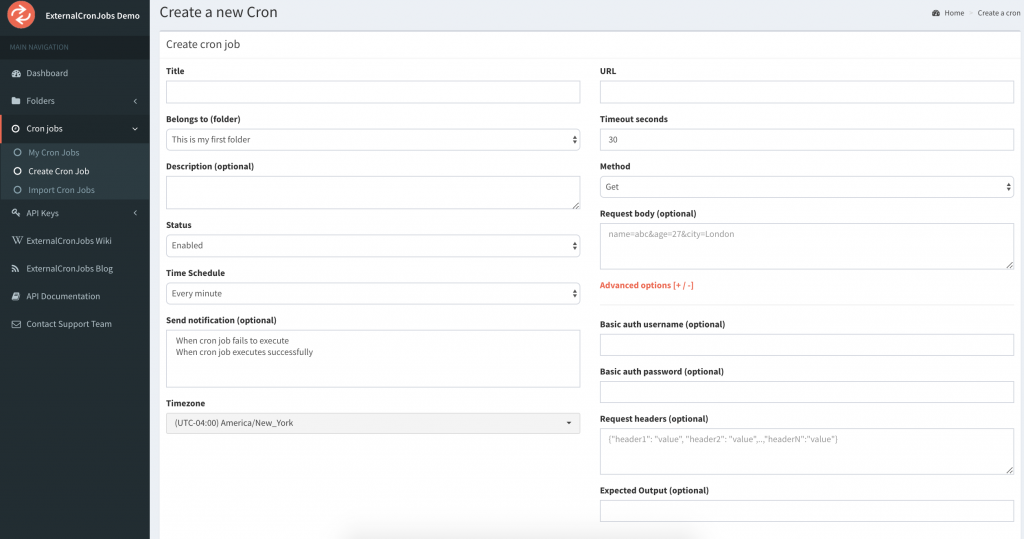
This page has below option to be filled.
TItle
This is the title of cron job, you can define short intro about what this cron job does exactly. For example, in my case, I have some cron jobs setup for payment processing, I have named that cron job “Order payment processing”
Belongs to (folder)
This option will provide you list of folders you have created. So that you can choose folder in which you want to put this cron job. More information about folders can be found here
Description
This field is optional and you can give some description about the cron job you’re going to create. Description can contain anything, like what this cron job does and list of action being performed under this.
Status
As name describes very easily, this is the status of cron job, either you want to enable it or disable it. Many times people prefer to disable their cron jobs in order to stop it temporarily or if they don’t want to lose any data they have stored.
Time schedule
This is the most important option when setting a cron job. It allows you set exact execution time of cron jobs. It contains list of options.
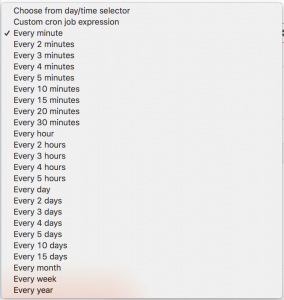
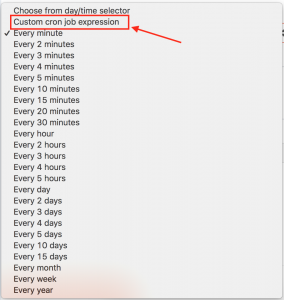
By default system provides you three ways to setup your cron jobs.
a) Predefined cron jobs schedules
b) Custom cron job expression
c) Choose from date/time selector.
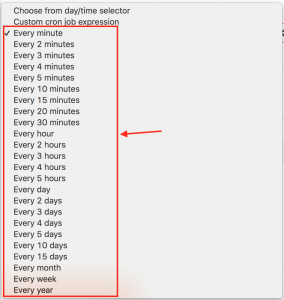
a) Predefined cron job schedules is the list of default time schedules ExternalCronJobs provides for ease. Under this option, you don’t need to write any cron job expression or you don’t need to select exact date/time for execution. You can simply select what matches to your criteria, like you want this cron job to be executed every minute, every hour, every day or every month etc. Here is the list of options come under predefined cron jobs.
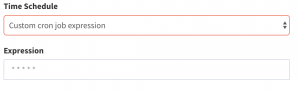
b) Custom cron job expression allows you to give custom expression to execute your job. This option is available as second option in the list of options.
Selecting this option opens a text box to insert a valid cron job expression.
Detailed information about cron job expressions can be found here
C) Choose from date/time selector option allows you to setup your cron job in pretty much custom way. If there is any complex expression or if you’re not sure about what expression you can choose to setup your cron jobs. This option is available on the top of options.
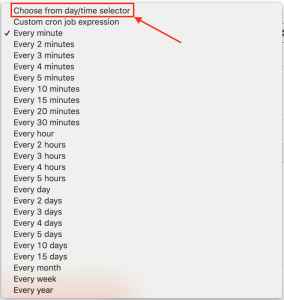
This option opens up a date/time selector for you.
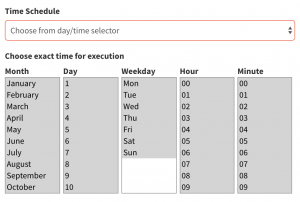
Date/time selector lets you chose below options
Month – Select name of month you want to execute cron job in. If you want to run it every month, select all months.
Day – Select from the range of 1 to 31. System will check if criteria matches, it will execute cron job. If you want to it to run every day, select all days.
Weekday – This option lets you chose day name, i.e. in case you want to run cron job in only particular days. If you want to run it everyday, you can chose all weekdays.
Hour – This option lets you chose exact hour this cron should execute at. It gives you option to chose hour from the range of 0 to 23. In case you want cron job should run every hour, you can select all these options.
Minute – This option lets you chose exact minutes you want your cron jobs should execute at.
Please note that these options are interrelated, so if you want to run your cron job every minute, you would have to select all months, days, day names, hours as well as minute. Because system runs cron job only if criteria matches.
In case you want your cron should run every day, you would have to select all months, days, daynames, hours and exact minute you want your cron job should execute it, like 00, 01 etc as selected in below image.
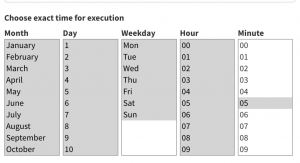
This expression will execute cron job every hour at 05 minutes, like 01:05, 02:05 etc.
Send notification
After selecting time schedule you have next option “Send notification” which has further two options to select.
a) When cron job fails to execute
b) When cron job executes successfully
a) When cron job fails to execute If this option is selected, system will notify you via email if any failure happens during cron jobs executions. Failures like server not found, connection refused or even if cron job didn’t return expected response.
b) When cron job executes successfuly If this option is selected, system will notify you via email on successful execution of this cron job.
Note: All failures/success notifications are sent every five minutes. So if you have any cron job which runs every minute and you have setup successful execution notification for that, system will still not email you every minute. System sends email every five minutes. That is the minimum time gap.
Timezone
Timezone is one of the most powerful features ExternalCronJobs provides. Timezone lets you choose the exact timezone in which you want to run this cron job. For example, if you have any cron jobs setup for database backup which runs every day, however you want those backups should happen at 03:00am New York time, because there is no much traffic on your website at that time. You can do that easily by choosing date and time from date time selector and you can select timezone New_York from timezone. System will make sure cron job executes at right time.
URL
This field requires a valid URL for making cron job HTTP call. This would be the exact URL which you want to be called at every defined interval.
Timeout seconds
This field lets you select default script timeout time. This is very useful to avoid long connections, so if your script takes long than x seconds, connection should be interrupted.
Note: As of now ExternalCronJobs supports maximum execution time 600 seconds, which is ultimately 10 minutes.
Method
ExternalCronJobs supports both Get as well as Post methods for HTTP call. You can select as per your preference.
Request body
This is optional field and used to store request body. You can give query string of your post fields and system will automatically send it to the server. For example, if your URL requires post variables like param1, param2. You can send it using param1=1¶m2=2.
Basic auth username
There could be the case that your URL is under some kind of HTTP/Basic authentication. In that case you would need username and password. This field would accept your username. You can keep this field empty if your URL is public.
Basic auth password
In case of basic HTTP/Basic auth, you have entered your username in above field. Now you need to put your password and this is the right field for that. You can keep this field empty if your URL is public.
Request headers
This field allows you to provide/override request headers. You need to provide valid JSON in this field. For example below input can be used.
{
“x-session-id”:”xjejr032nvs03jdf023nfw0r”,
“x-access-token”: “asfasdf98af8asf8saf8adsfd8sfasd8f”
}
This is optional field, if you don’t want to override request headers, you can simply keep this field empty.
Expected output
This field is useful when you want to be notified if cron job doesn’t return expected output. For example, if you have a url http://www.domain.com/cron and after execution it returns 1. You can write 1 Expected output field and system will notify you if cron job doesn’t return expected output.
Note: Your cron job will be marked as failed if it doesn’t return expected output even if it return 200 HTTP code.
Recent Comments